Wednesday, May 15, 2013

Mural Restoration - Day 3 / Cheviot Hills, CA

Another day under the "sun-umbrella" is not bad... 

I began day 3 with patching and filling in some damaged cracks on the wall 
This was a fairly easy patch and went on rather easily.  The tough part was waiting for it to dry, but there were plenty of other areas for me to focus on while it did.

I cleaned, patched and primed another section.


I cleaned and restored the painted umbrella


I painted and blended a section of the sky...  can you see the old paint compared to the new?
Hopefully when it is dry they will blend well.

I gave the beach blanket some new life too.  I'm not sure what color it was originally, but it is now yellow.

I got the outline and general position of the little girl back in place, and have some shaping and details to work on.  The section of sky above her head is where I will start next time.

The big question...  Can you see the patch and the crack???   I consider that alone to be one of the biggest challenges accomplished.  One more day of painting and this lovely scene is finished!

Ah, the sky and the ARCH are now patched and blended too.

Day 3, Complete!


Tuesday, May 14, 2013

Mural Restoration - Day 2 / Cheviot Hills, California

I must admit, 81 degrees in the shade equates to "horrible" working conditions.  Add a pool, and a sun umbrella, and the only thing missing is the time to actually take a dip in the water.  Ah well, work, work, work...

Before starting work I took some more progressive photos... just to keep track of what I'd already done.  Clean and Primer where the palm trees were, and now re-paint and add some life to this section.  This would also challenge me to mix and test the colors on the spot...

 I also took a walk and took pictures of the other sections.


So this is me set up for starters today.

 I loosely marked in the shape of the palms and stood back to make sure the scale and shape were somewhat accurate.  I think I did a pretty good job.

Matching the blues and greens wasn't so tough, but getting it to blend, new to old was a little tricky.   But this has been a fun challenge.


 I began prepping and cleaning some other sections of the damaged mural.  Above the sun-bathers, there was a small section of peeling paint.
 I was sad when I got to the section of the mural with the little girl building a sand castle.  I really hoped to have a simple repair... but the cracked wall underneath had left a huge air / water bubble that just popped the paint off from the wall.  

 You can see the crack above the girl's back.  It continues up into the clouds.  The blistered paint came off easily and will be quick to patch and clean up when I go back in a few days.

 Standing back to look at what I've done today, I'm pleased with the progress.  Much more work to do next time...

Thursday, May 9, 2013

MURAL RESTORATION PROJECT - Cheviot Hills, CA

Several Months ago I got a very unique phone call.

A gentleman called my cell phone #, asking for an artist with the name "Suzanne", who painted murals, who lived in the Los Angeles area...

3 out of 3, not bad...

who Painted a mural in his back yard 10+ years ago which is in need of touch up...

Hmm.... that's NOT me!

I replied to the caller,  "Ironically, my name is Suzanne, and I do paint murals, however I didn't paint that mural."  I then learned that he'd searched and found a link to my art and website, and now here we are...

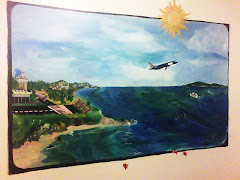
So I proceeded to invite him to send me some photos of the mural in question and I would be happy to take a look, and provide a restoration job on the existing mural.  I have a happy realization that this other artist, named Suzanne, did a wonderful painting of a beach scene, with palm trees, a panoramic view of the Santa Monica Bay, and the scene is very much something I would paint, and the style is very much similar to what I do as well... so yes, I could do this work.  :)

5 months later, he calls again and I visit the property.

The back wall in question had been subject to water damage from the adjacent property, and caused cracking and peeling paint in several spot.  Now that the neighbor has fixed the cause of the water leak and no further damage is expected, and the wall has dried out we can now proceed to repair and refresh the mural.

Monday, I was all set to start on the project, and got set back due to rain... Yes, a Rain Delay in May? Oh well... so let's try again later.

Thursday:  May 9th...
Mural Day One:

I started off by cleaning and scraping off the damaged and blistering sections of the mural
I cleaned around the areas that were not damaged, and took care to preserve my "namesake's" signature.
When I am finished I will mark "Original design by - "Suzanne", and note the Restoration with my own signature below.

 Of course I am curious who the other "Suzanne" is.  It's a curious mystery....
 The section with the palm trees was fairly quick to clean... and I have put on a layer of masonry primer.
Here's a photo of the crack and damage on the wall, above the girl's shoulders, the sailboat may be a loss, but i did take paint samples so that I can match the tones and placement.

What a wonderful picture of the little girl (his daughter at age 5), and I am nervous that too much of her will be damaged under.  Look between her two arms, you can see the blistering paint.  It continues through her torso.  The sand castle is also damaged.  I hope to keep this as authentic as possible.

I return next Monday to continue the work.